Welcome
Please enter company name
User Guide
A user guide provides clear instructions to help users understand and effectively use a product or system
General
KPoD is a proof of delivery solution that helps organizations manage order dispatch, driver assignment, delivery execution, customer confirmation, and delivery status tracking from one connected portal and mobile application.
The solution supports both product deliveries and service-based jobs. Orders can be created manually in KPoD or synced from external business systems such as Microsoft Dynamics 365, Business Central, Vendor Portal, or other supported ERP applications.

Who Should Use This Guide
This guide is intended for:
| User Type | Purpose |
|---|---|
| System Administrator | Configure companies, users, roles, permissions, parameters, and integrations |
| Operations / Dispatcher | Create orders, convert orders to delivery schedules, and assign drivers |
| Warehouse / Supervisor | Monitor order movement, delivery readiness, and dispatch activity |
| Driver | Use the KPoD mobile application to pick, deliver, collect, hold, or cancel assigned orders |
Before You Begin
Before processing deliveries in KPoD, make sure the following setup is completed:
- At least one company is created.
- Roles and permissions are configured.
- Internal users are created and assigned access.
- Parameters are configured.
- Sites and warehouses are available.
- Vehicles and drivers are created.
- Products and customers are available manually or through ERP sync.
Important:
The default company should not be used for delivery processing. A specific company must be created and used for delivery operations.
Recommended Setup Sequence
For a smooth implementation, configure KPoD in the following order:
- Create Company
- Configure Roles & Permissions
- Create Users
- Configure Parameters
- Configure Integration, if applicable
- Create Sites
- Create Warehouses
- Add Vehicles
- Add Drivers
- Configure Currency
- Create Units of Measure
- Create Product Categories
- Add Products
- Add Customers and Shipping Addresses
- Create Orders
- Convert Orders to Delivery Schedule
- Assign Drivers
- Execute Delivery from Mobile App
Flow Diagram

Quick Start Guide
Step 1: Setup the Organization
Create the company or legal entity that will process deliveries.Step 2: Configure Access
Create roles, assign permissions, and add users.Step 3: Configure System Parameters
Define delivery rules such as signature requirement, driver notes requirement, and approval workflow.Step 4: Setup Operational Structure
Create sites, warehouses, vehicles, and drivers.Step 5: Setup Master Data
Create products, units of measure, categories, customers, and shipping addresses.Step 6: Create or Sync Orders
Orders can be created manually or synced from an ERP system.Step 7: Convert Orders to Delivery Schedule
Convert one or multiple orders into delivery schedules.Step 8: Assign Driver
Assign a driver and vehicle to the delivery schedule.
Upload inspection images of the vehicle if necessary.Step 9: Driver Executes Delivery
Driver logs in to mobile app, marks order as picked, captures proof, and completes the delivery.Step 10: Track Status
Operations team monitors delivery status from the portal.
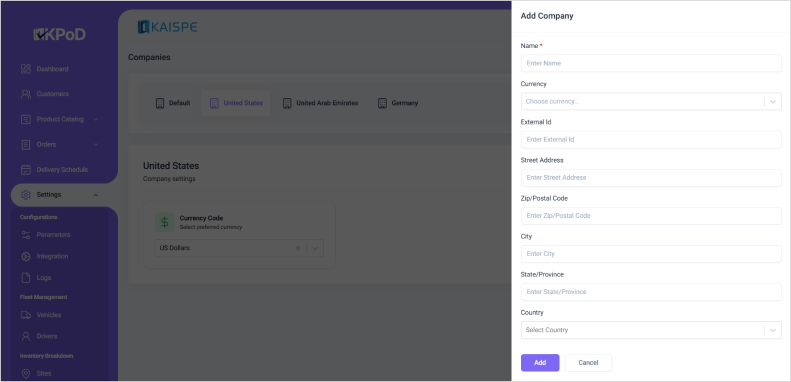
Companies
The Companies module is used when a tenant or organization operates multiple legal entities, companies, or business units within the same KPoD portal.
Each company can manage its own delivery operations and order processing while keeping records separate from other entities. Some areas, such as user settings and roles and permissions, remain globally managed across the portal.
Why this matters:
A company must be created before starting any delivery process. Deliveries must be mapped to a specific company to work correctly.
Steps to Create a Company
- Go to Settings > Organization > Companies
- Click New
- Enter the Company Name
- Add optional details such as:
- Currency
- External ID
- Address
- Click Save
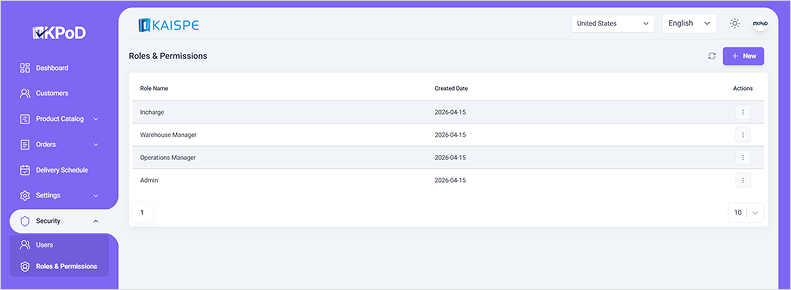
Roles & Permissions
Roles and permissions define what each user can access and perform in the KPoD portal.
Once a role is created and assigned to a user, the user can only view and use the modules and actions allowed under that role.
Permission Types
| Permission | Description |
|---|---|
| Create | Allows the user to create new records |
| Read | Allows the user to view records |
| Update | Allows the user to edit existing records |
| Delete | Allows the user to remove records |
Steps to Create a Role
- Go to Settings > Security > Roles & Permissions.
- Click New.
- Enter the Role Name.
- Click Save.
Steps to Assign Permissions
- Open the three-dot menu on the role record.
- Select Permissions.
- Review the available modules.
- Enable or disable Create, Read, Update, and Delete permissions for each module.
- Save the permission setup.

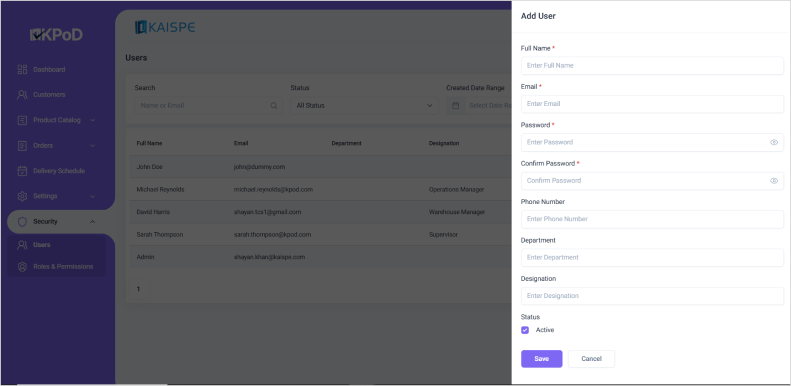
Users
Users are internal company staff who access and operate the KPoD portal. Examples include administrators, warehouse managers, supervisors, dispatchers, and operations users.
Each user should be assigned a role and company access based on their responsibility.
Steps to Create a User
- Go to Settings > Security > Users.
- Click New.
- Enter the required details:
- Full Name
- Password
- Add optional details, if needed.
- Click Save.
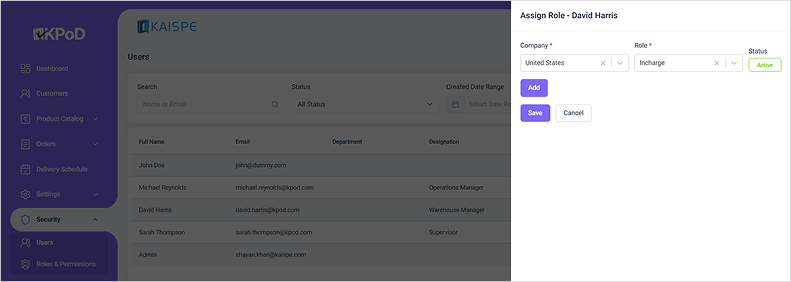
Steps to Assign Access Control
- Open the three-dot menu on the user record.
- Select Access Control.
- Select the company the user can operate in.
- Assign the appropriate role.
- Save the access setup.
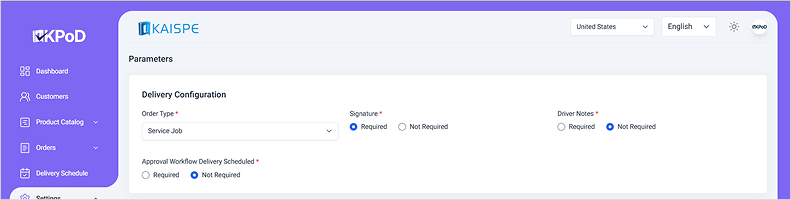
Parameters
The Parameters module controls system-wide settings that define how KPoD behaves across delivery operations.
Delivery Configurations
| Field | Purpose |
|---|---|
| Order Type | Select Product Delivery or Service Job |
| Signature | Set as Required or Not Required |
| Driver Notes | Set as Required or Not Required |
| Delivery Schedule Approval Workflow | Set as Required or Not Required |
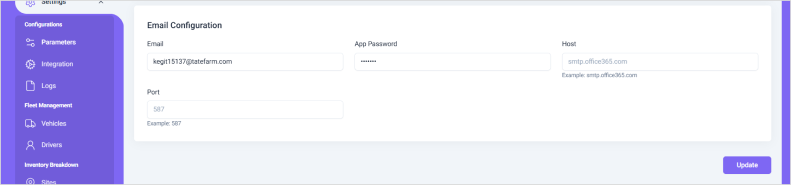
Email Configuration
This section allows administrators to configure SMTP settings for automated email notifications.
Typical fields include:
- App Password
- Host
- Port
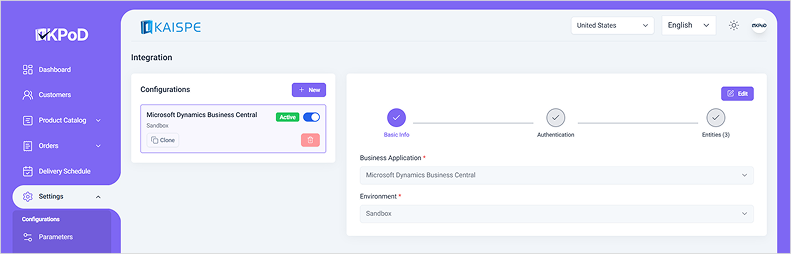
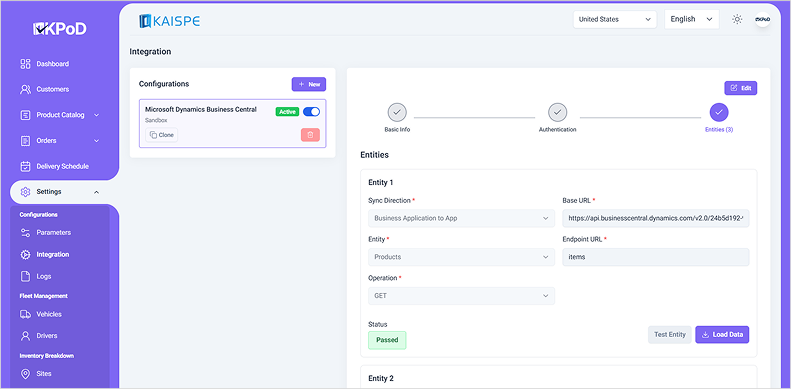
Integrations
The Integrations module allows KPoD to connect with external ERP or business applications. This enables automatic data sync for orders, customers, products, and related operational data.
KPoD can support integrations with systems such as:
- Microsoft Dynamics 365 Business Central
- Microsoft Dynamics 365 Finance & Supply Chain Management
- Vendor Portal
- Other supported ERP or business applications
Steps to Create an Integration Configuration
- Go to Settings > Configurations > Integrations
- Click New
- Enter the Business Application
- Select the Environment
- Click Next
- Enter integration credentials:
- Client ID
- Client Secret
- Auth URL
- Scope
- Click Next
- Configure entities:
- Sync Direction
- Base URL
- Endpoint URL
- Entity
- Operation
- Click Save Configuration
Sync Direction Options
| Sync Direction | Description |
|---|---|
| Business to Application | Data flows from ERP/business system to KPoD |
| Application to Business | Data flows from KPoD to ERP/business system |
| Both | Data flows in both directions |
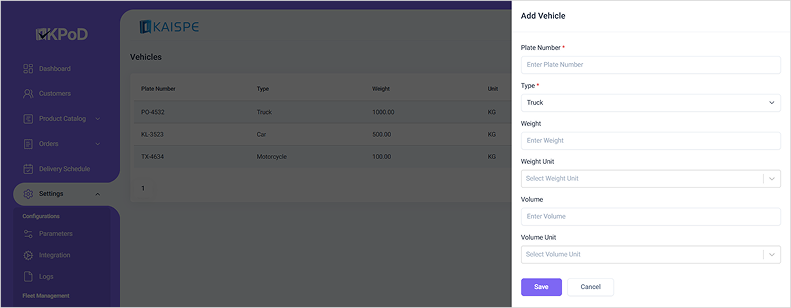
Vehicles
Vehicles represent the delivery fleet used to transport and fulfill orders.
Each vehicle is registered in KPoD and can be assigned during the delivery process. This helps maintain accountability and traceability for every shipment.
Important:
An order cannot be dispatched without a vehicle assignment where vehicle assignment is required by the process.
Steps to Add a Vehicle
- Go to Settings > Fleet Management > Vehicles.
- Click New.
- Enter Details
- Plate Number
- Vehicle Type
- Add optional details, if needed.
- Click Save.
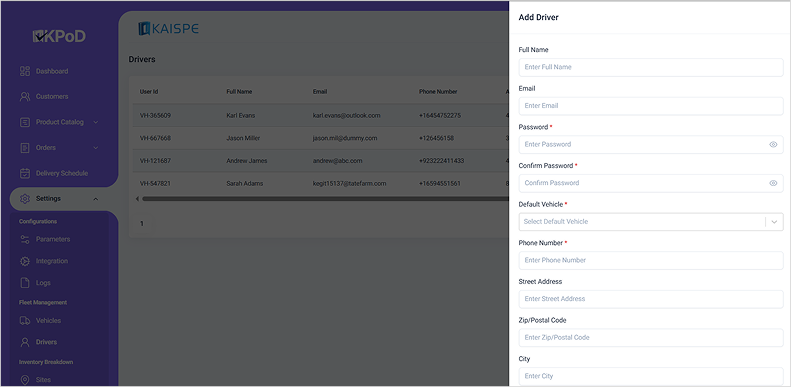
Drivers
Drivers are field operators responsible for picking up and delivering orders to the customer location.
Each driver is registered in KPoD and can be linked to a vehicle during the delivery process. Drivers may handle both product deliveries and service jobs.
Steps to Add a Driver
- Go to Settings > Fleet Management > Drivers.
- Click New.
- Enter Details
- Password
- Confirm Password
- Default Vehicle
- Phone Number
- Add optional details such as:
- Full Name
- Street Address
- Set the driver status to Active.
- Click Save.
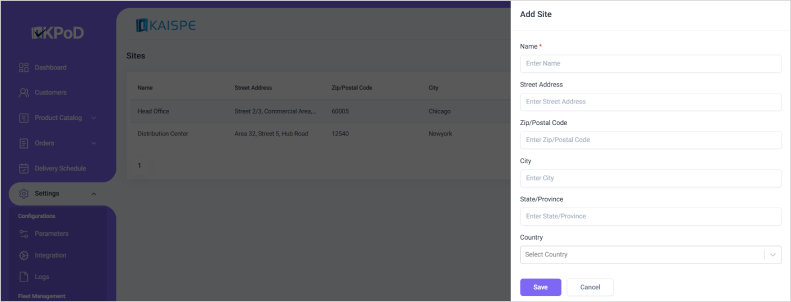
Sites
Sites represent the company's physical locations, branches, or operational locations from which activities are managed.
Each site should be configured so that orders and warehouses can be mapped to the correct operational location.
Steps to Add a Site
- Go to Settings > Inventory Breakdown > Sites.
- Click New.
- Enter Site Name
- Add optional details, if needed.
- Click Save.
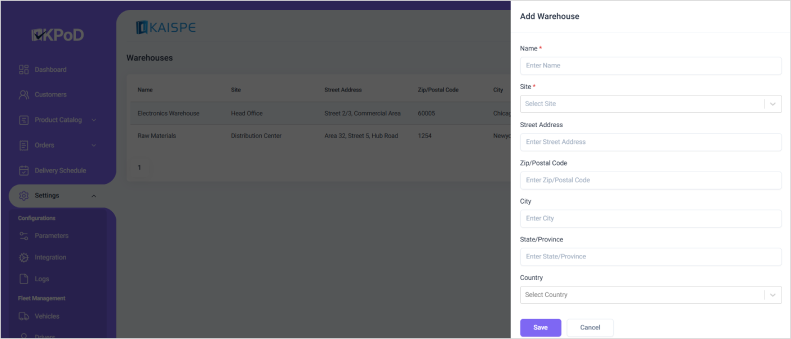
Warehouse
Warehouses are storage or dispatch points from which orders are picked and sent for delivery.
Each warehouse is linked to a site, helping teams identify where orders originate from.
Steps to Add a Warehouse
- Go to Settings > Inventory Breakdown > Warehouses.
- Click New.
- Enter Warehouse Name
- Select the related Site.
- Add optional details, if needed.
- Click Save.
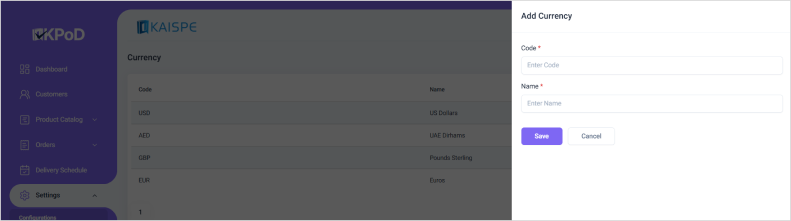
Currency
The Currency module defines currencies used across delivery operations.
Configured currencies can be selected when setting up companies and other financial configurations.
Steps to Add Currency
- Go to Settings > Payment Setup > Currency.
- Click New.
- Enter Details
- Code
- Name
- Click Save.
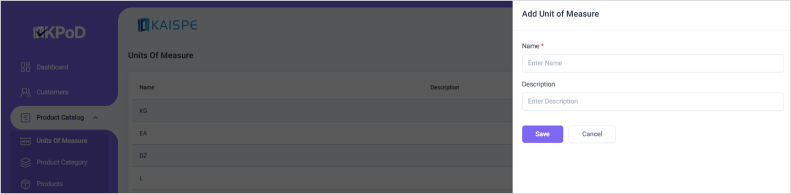
Unit of Measure
Units of Measure define how products are measured and transacted in the system.
Examples include:
- Kilograms
- Liters
- Meters
- Pieces
- Boxes
Correct unit configuration helps maintain accurate quantities during order creation and delivery confirmation.
Steps to Add Unit of Measure
- Go to Product Catalog > Units of Measure.
- Click New.
- Enter the Unit Name.
- Click Save.
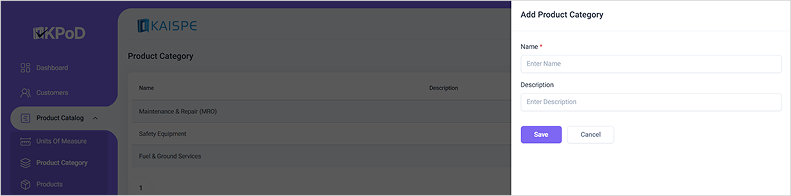
Product Category
Product categories help organize products into logical groups.
This makes it easier to search, filter, and assign products when creating orders.
Steps to Add Product Category
- Go to Product Catalog > Product Category.
- Click New.
- Enter the Category Name.
- Add a description, if needed.
- Click Save.
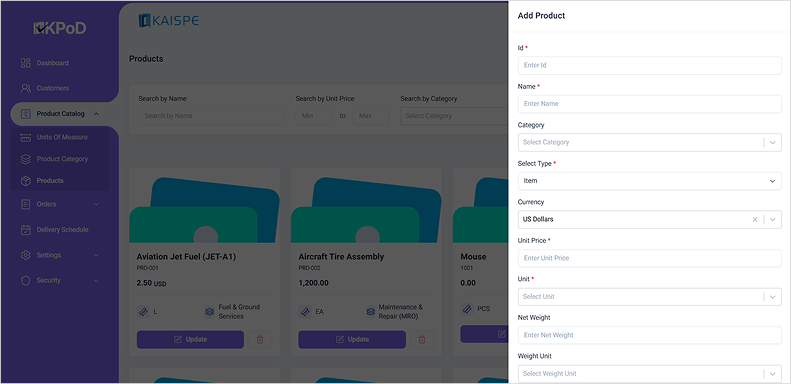
Products
Products are the items being delivered through KPoD.
This makes it easier to search, filter, and assign products when creating orders.
Products may be:
- Synced automatically from an ERP system
- Created manually in the KPoD portal
Steps to Add Product
- Go to Product Catalog > Products.
- Click New.
- Enter the required details:
- ID
- Name
- Type
- Unit Price
- Unit
- Add optional details:
- Net Weight
- Weight Unit
- Product Image
- Enable Is Hold, if the product should be placed on hold by default.
- Click Save.
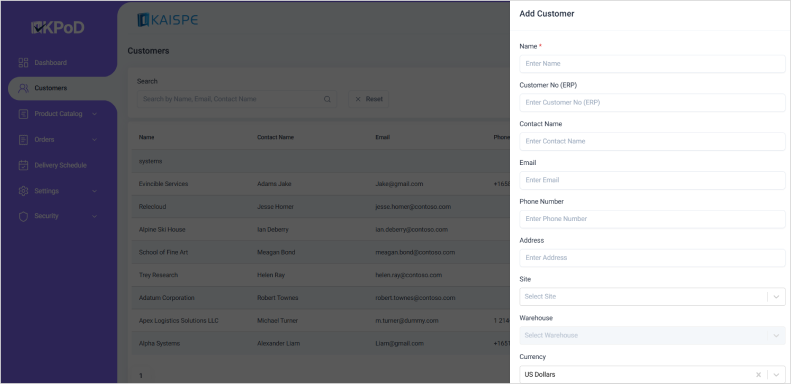
Customers
Customers represent the businesses or organizations receiving deliveries through KPoD.
Customer records store the key information required to process orders and deliver to the correct destination.
Steps to Add Customer
- Go to Customers.
- Click New.
- Enter the Customer Name.
- Add optional details, if needed.
- Click Save.
Shipping Addresses
A customer can have multiple shipping addresses.
This is useful when a customer has multiple branches, delivery locations, warehouses, or operating sites.
Steps to Add Shipping Address
- Open the customer module.
- Click the three-dot menu.
- Select View.
- Go to the Shipping Details tab.
- Click New.
- Enter Details:
- Address Label
- Street Address
- Add optional details, if needed.
- Click Save.

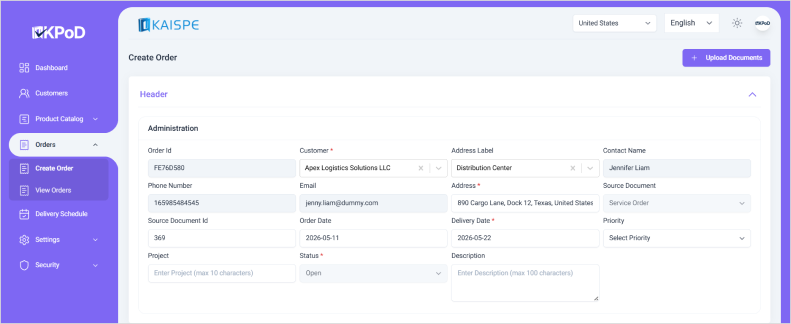
Service Order
Service Orders are used to manage and deliver service-based activities to a customer location.
Examples include:
- Installation
- Replacement
- Inspection
- On-site service tasks
Header Section
| Field | Purpose |
|---|---|
| Customer | Select the customer. Contact details auto-populate where available |
| Address Label | Select the customer shipping address label |
| Address | Auto-populates based on address label |
| Source Document | Pre-set as Service Order |
| Source Document ID | Optional reference |
| Delivery Date | Mandatory delivery date |
Lines Section
| Field | Purpose |
|---|---|
| Transaction Type | Item, Hour, or Expense |
| Product Name | Select product/service, if applicable |
| Quantity | Enter service quantity or effort |
Steps to Create a Service Order
- Go to Orders.
- Click Create Order.
- Select the Customer.
- Select the Address Label.
- Confirm the auto-populated address and contact details.
- Enter the Delivery Date.
- Add service order line details.
- Click Create.
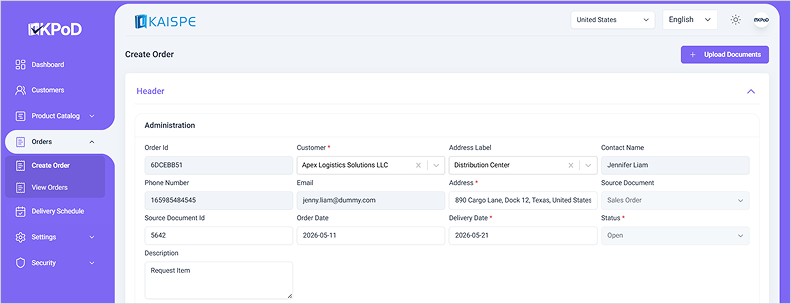
Sales Order
Sales Orders are used to manage physical goods delivery to customers.
The structure is similar to Service Orders, but sales order lines focus on products, quantities, units, and related product details.
Header Section
| Field | Purpose |
|---|---|
| Customer | Select the customer. Contact details auto-populate where available |
| Address Label | Select the customer shipping address label |
| Address | Auto-populates based on address label |
| Source Document | Pre-set as Sales Order |
| Source Document ID | Optional reference |
| Delivery Date | Mandatory delivery date |
Lines Section
| Field | Purpose |
|---|---|
| Product Name | Select the product to be delivered |
| Quantity | Enter delivery quantity |
| Unit / Weight | Auto-populates where configured |
Steps to Create a Sales Order
- Go to Orders.
- Click Create Order.
- Select the Customer.
- Select the Address Label.
- Confirm the auto-populated address and contact details.
- Enter the Delivery Date.
- Add product lines.
- Click Create.
Convert Order to Delivery Schedule
Once an order is created, it must be converted into a Delivery Schedule before it can be assigned to a driver.
Orders can be converted:
- Individually
- In bulk
Steps to Convert Orders
- Go to the relevant order list.
- Select one or more orders.
- Click Convert Orders.
- Confirm the action.
- Converted orders appear in the Delivery Schedule module.
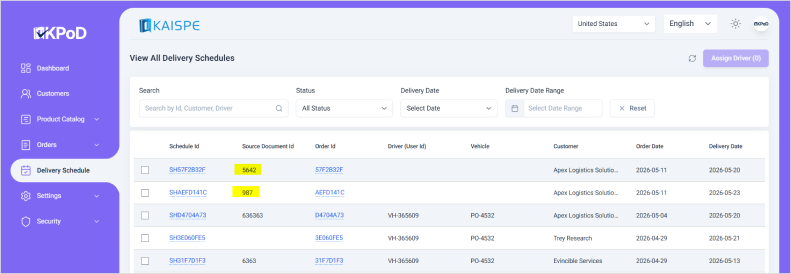
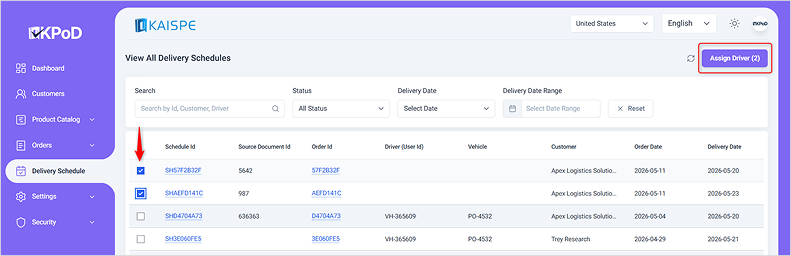
Driver Assignment
Drivers are assigned from the Delivery Schedule module.
Driver assignment can be completed:
- For a single order
- In bulk for multiple schedules
Once a driver is assigned, the order becomes ready for dispatch and can appear on the driver's mobile app, depending on the approval workflow configuration.
Steps to Assign Driver
- Go to Delivery Schedule.
- Select the delivery schedule record.
- Click Assign Driver.
- Select the driver.
- Confirm the assignment.
Mobile App Flow
Once an order is assigned and approved, the delivery person completes the delivery process using the KPoD mobile application.
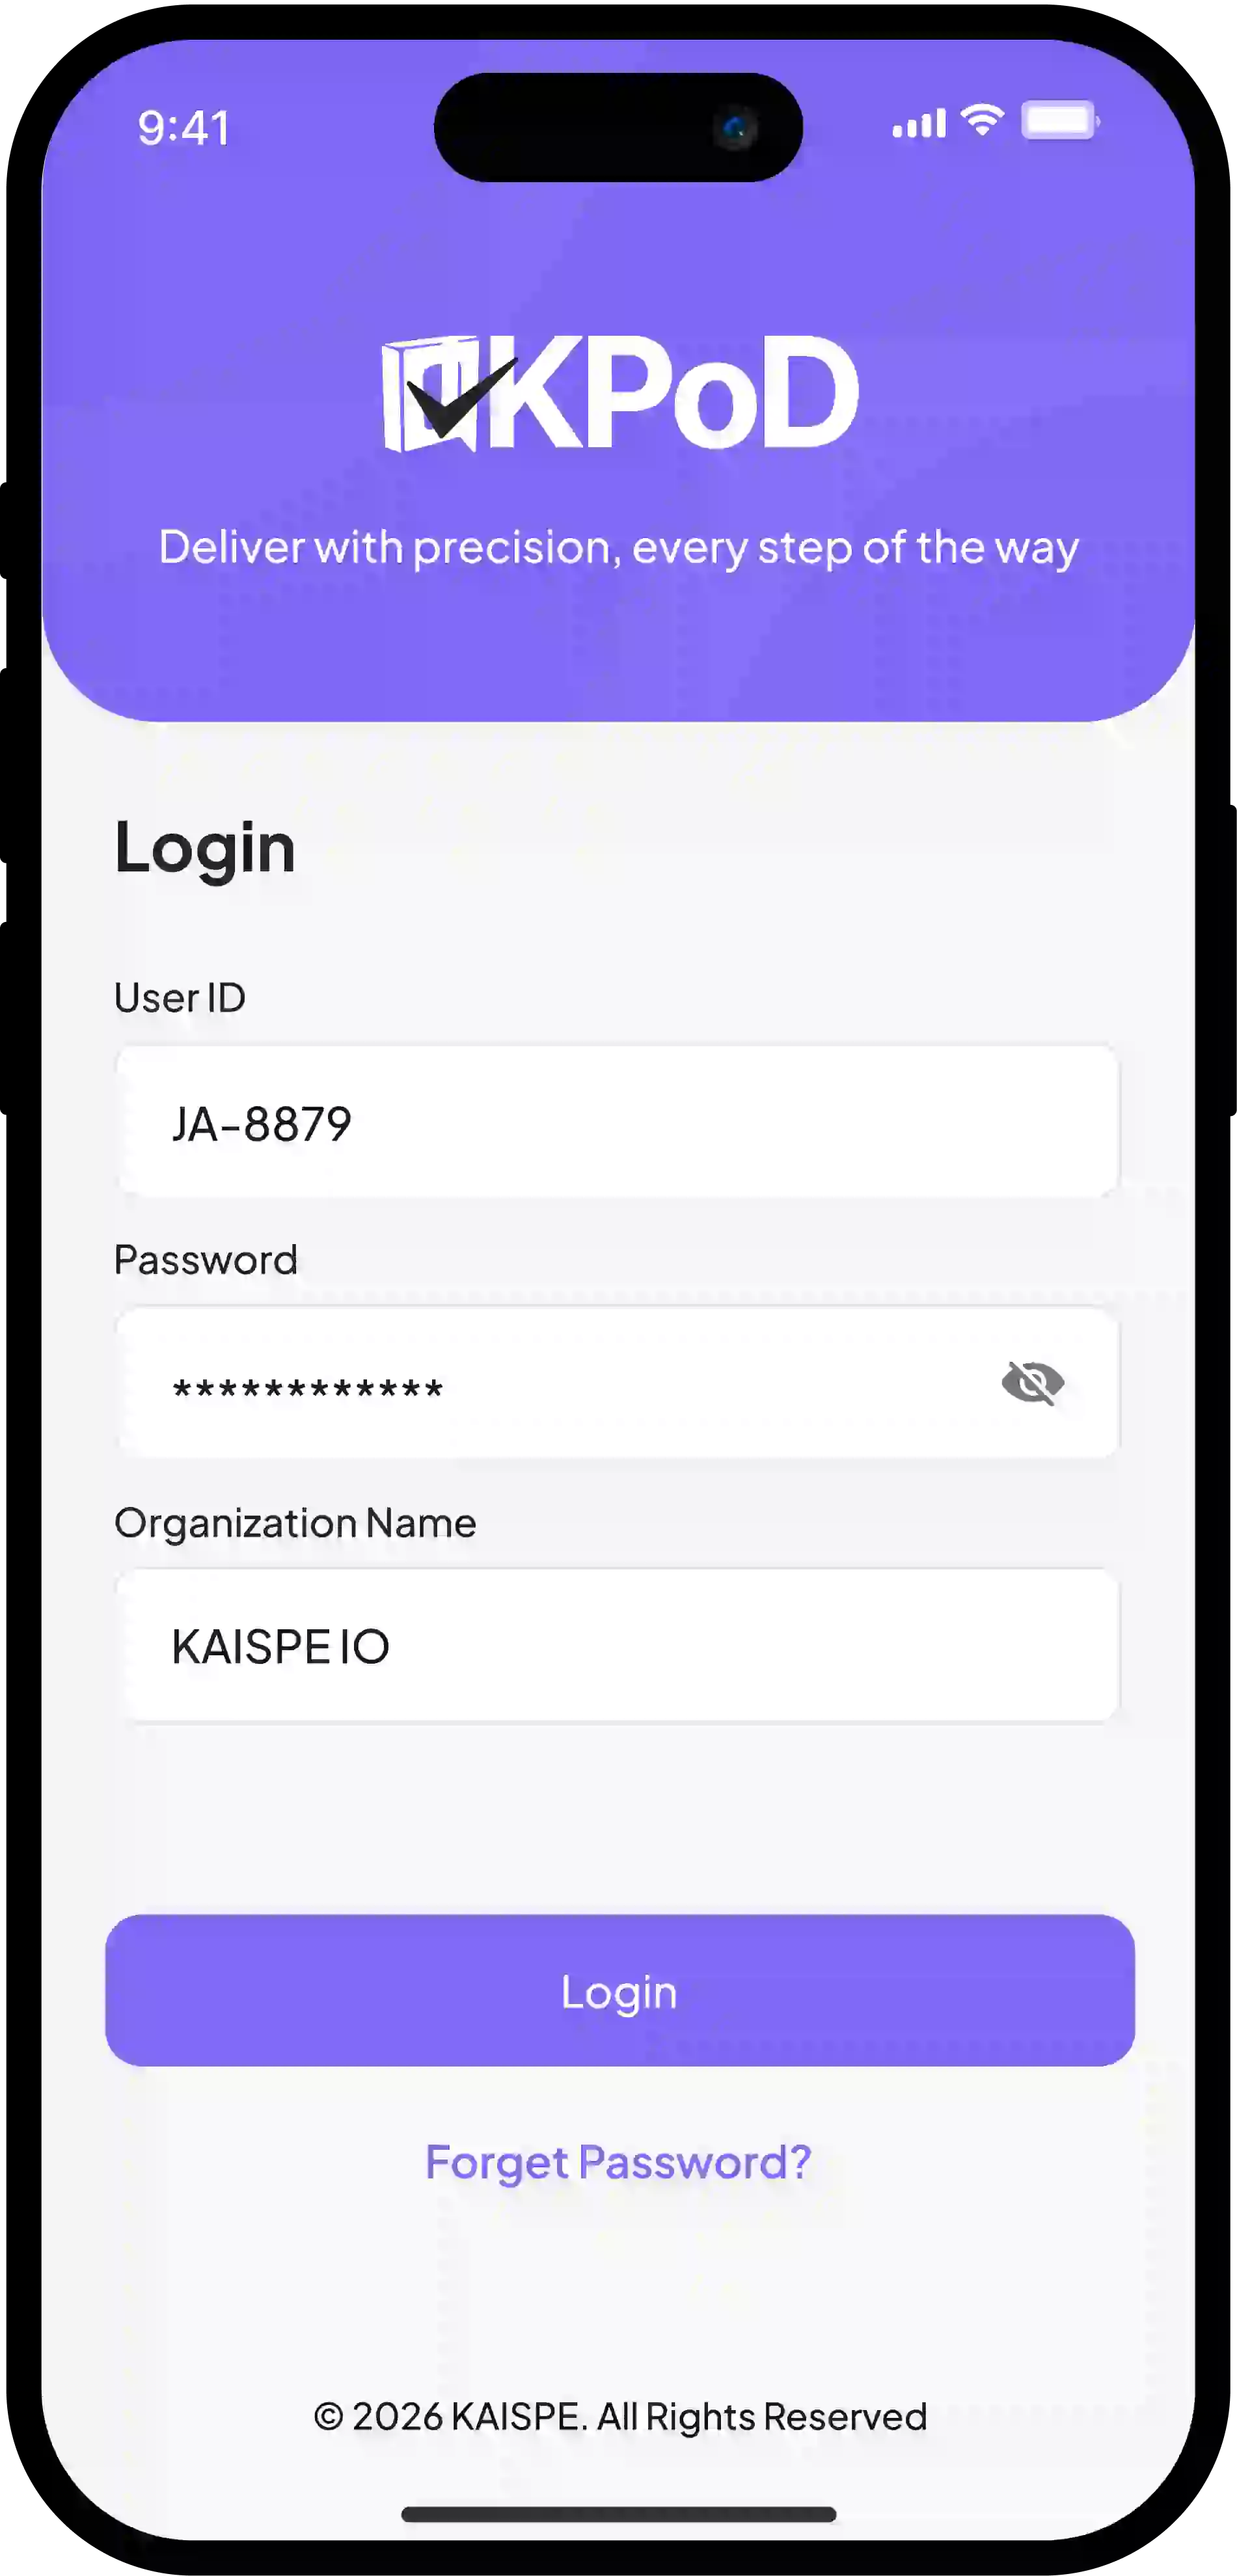
Step 1: Login
The driver logs in using:
- User Id
- Password
- Organization Name
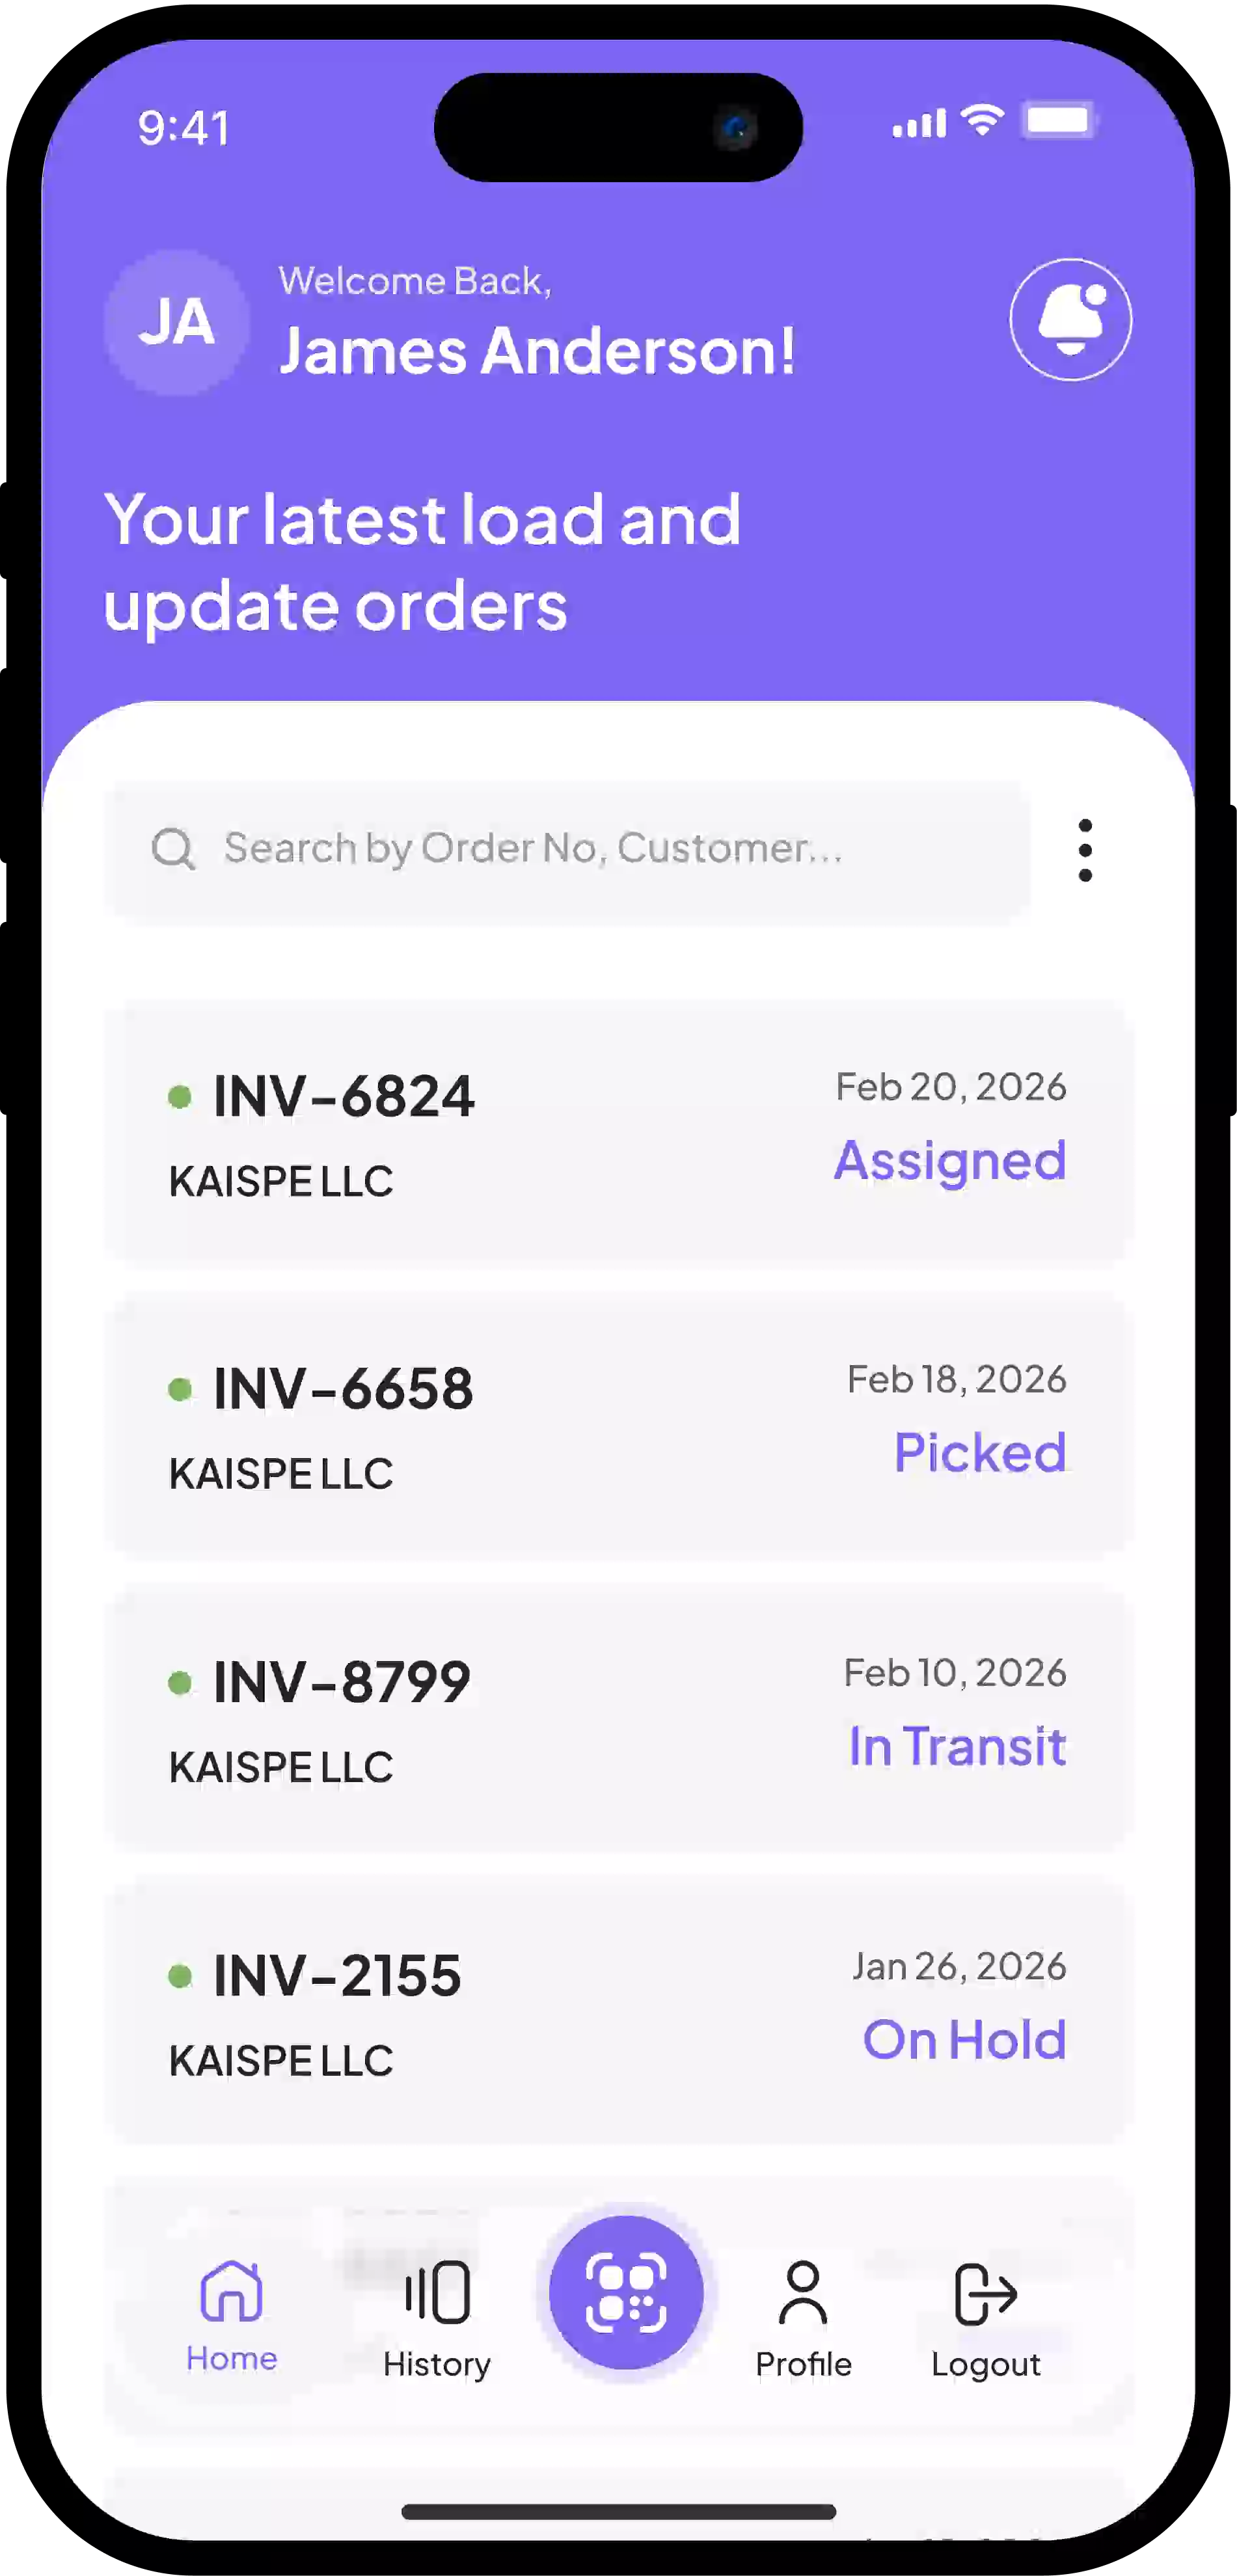
Step 2: View Assigned Orders
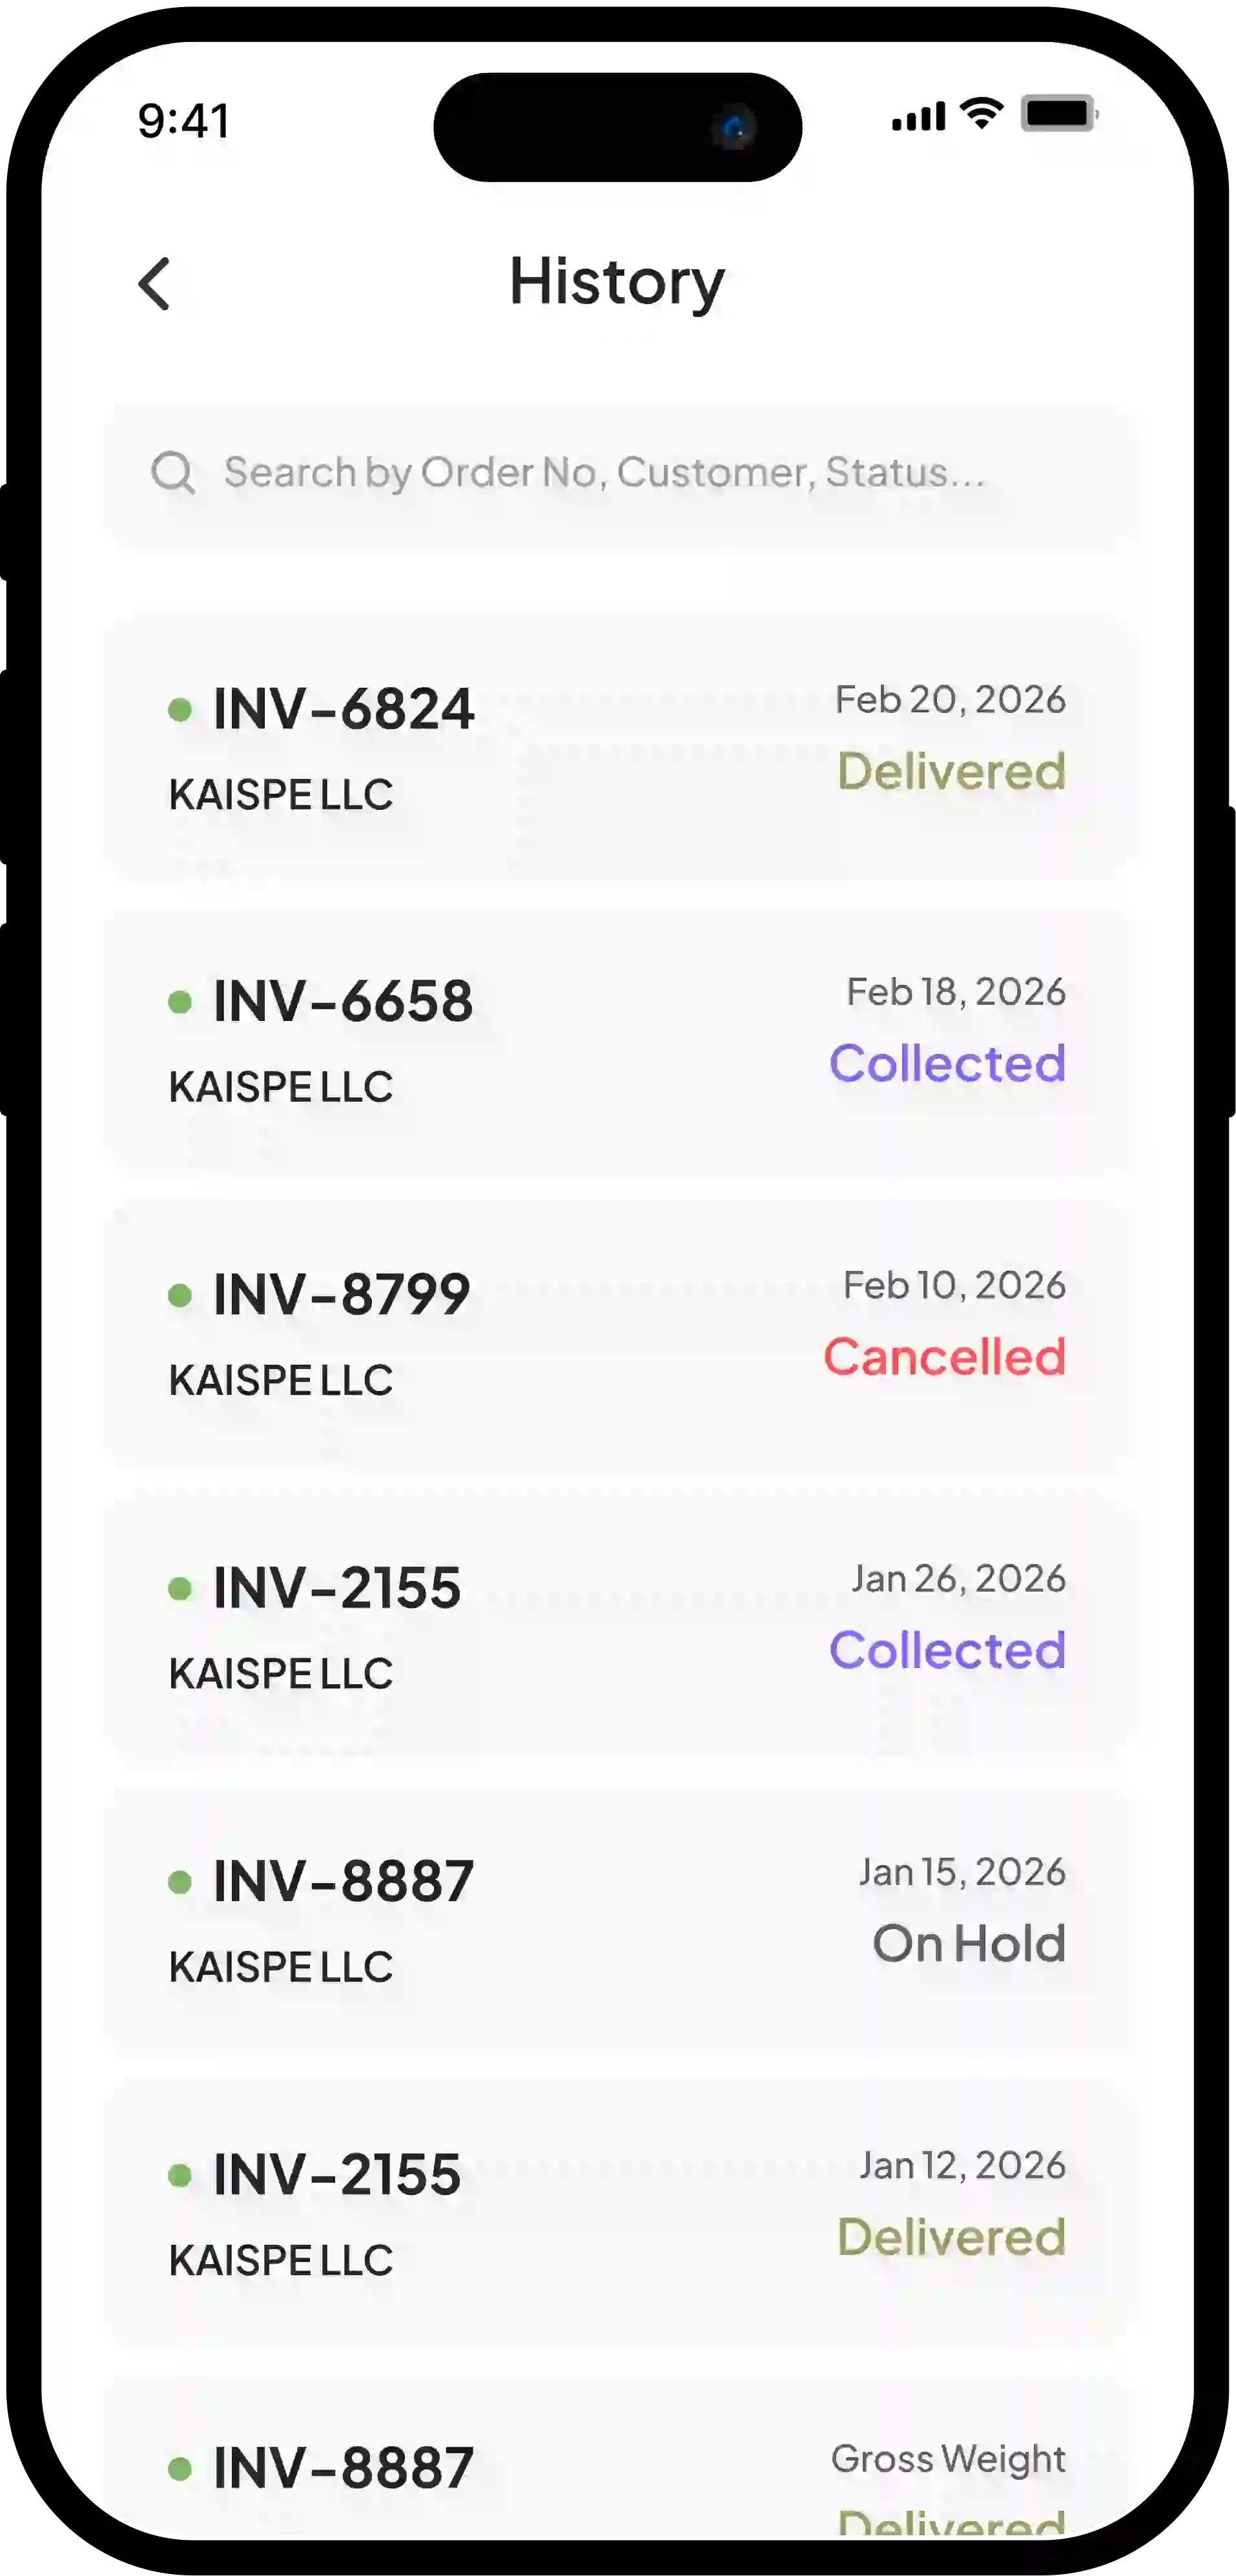
The Home Screen displays all assigned orders. Delivery person can view:
- Order details
- Customer information
- Delivery address
- Delivery status
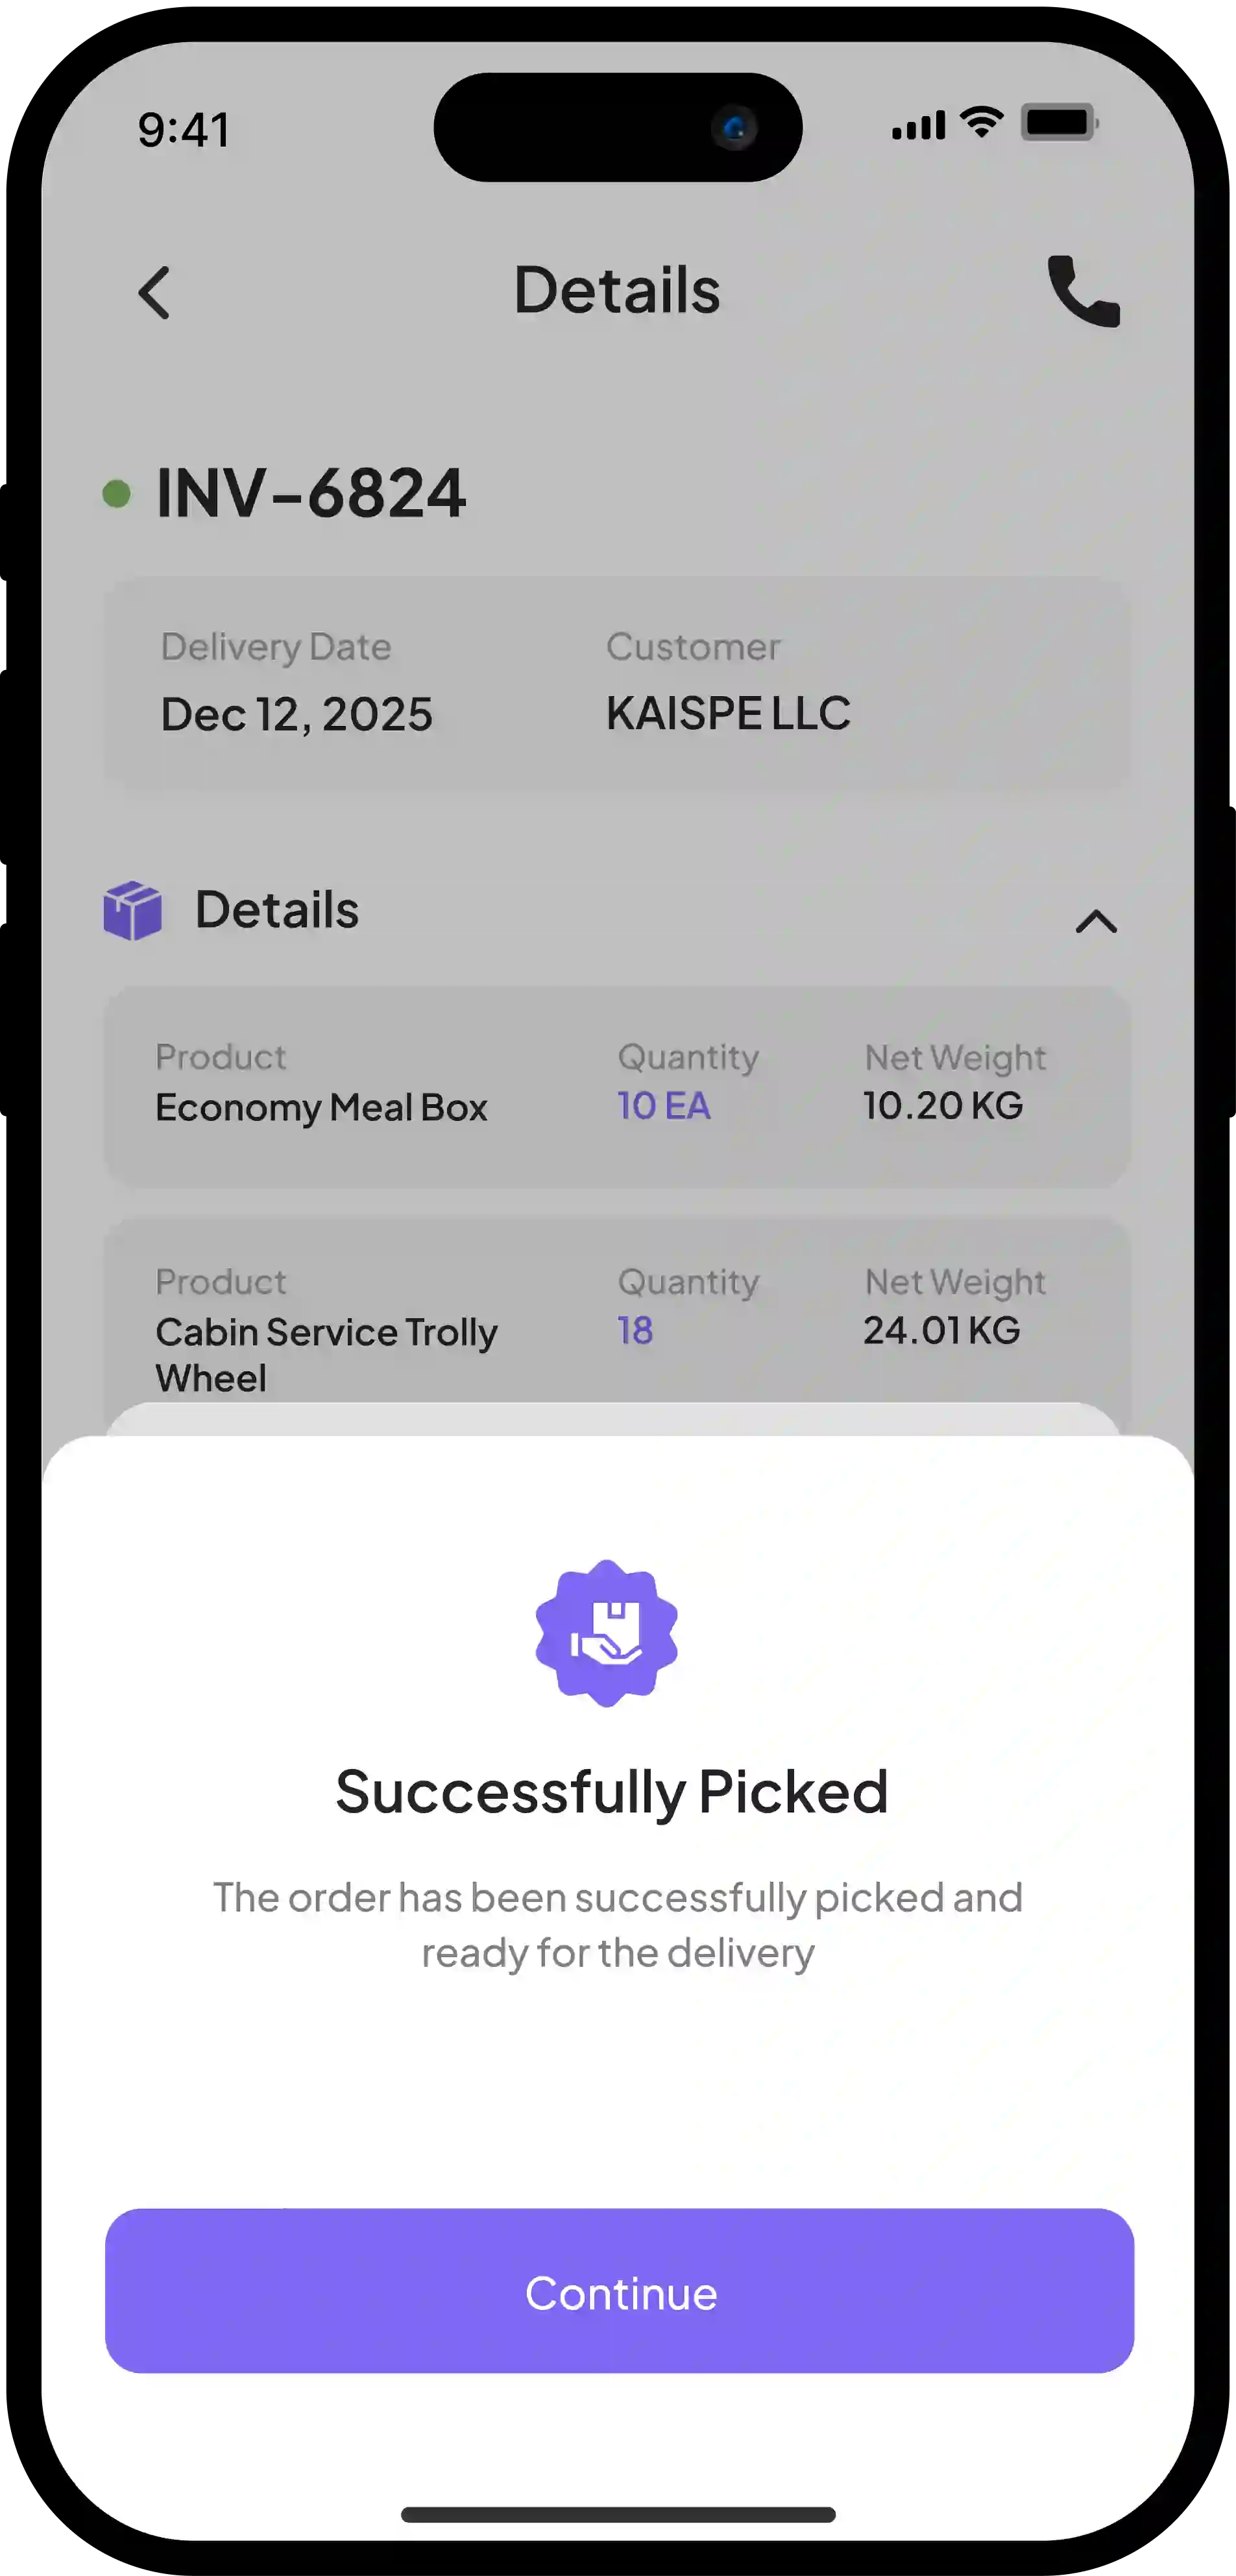
Step 3: Pick the Order
The delivery person taps the order and marks it as Picked.
This confirms that the driver has taken responsibility for the items or is ready to perform the service.
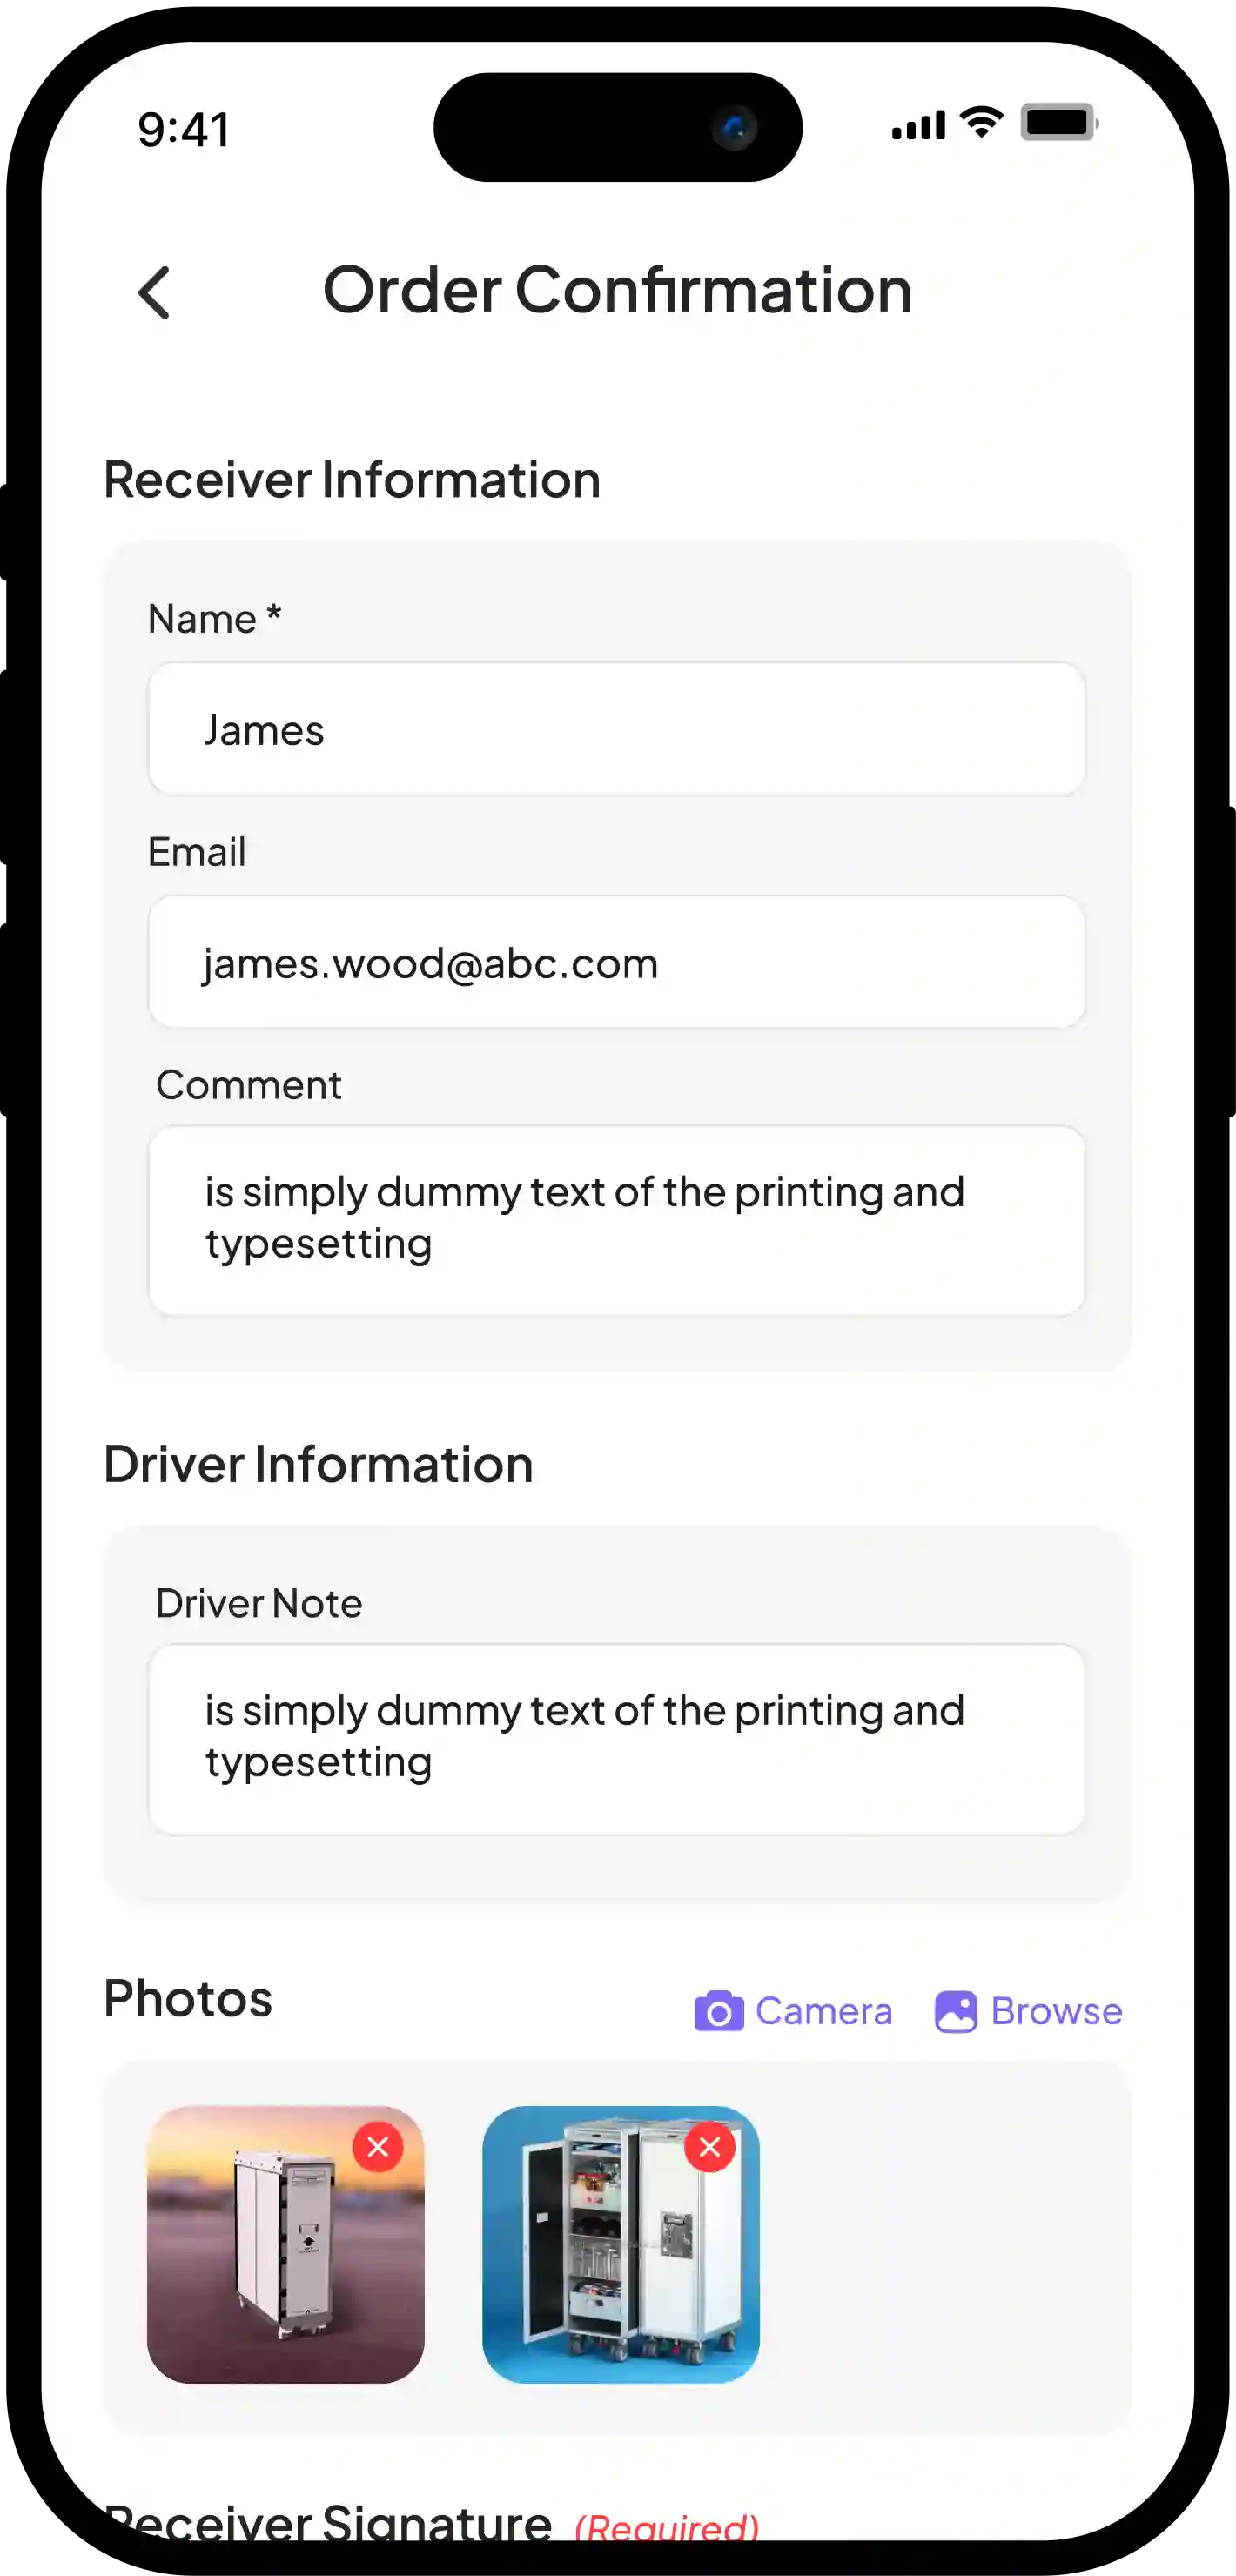
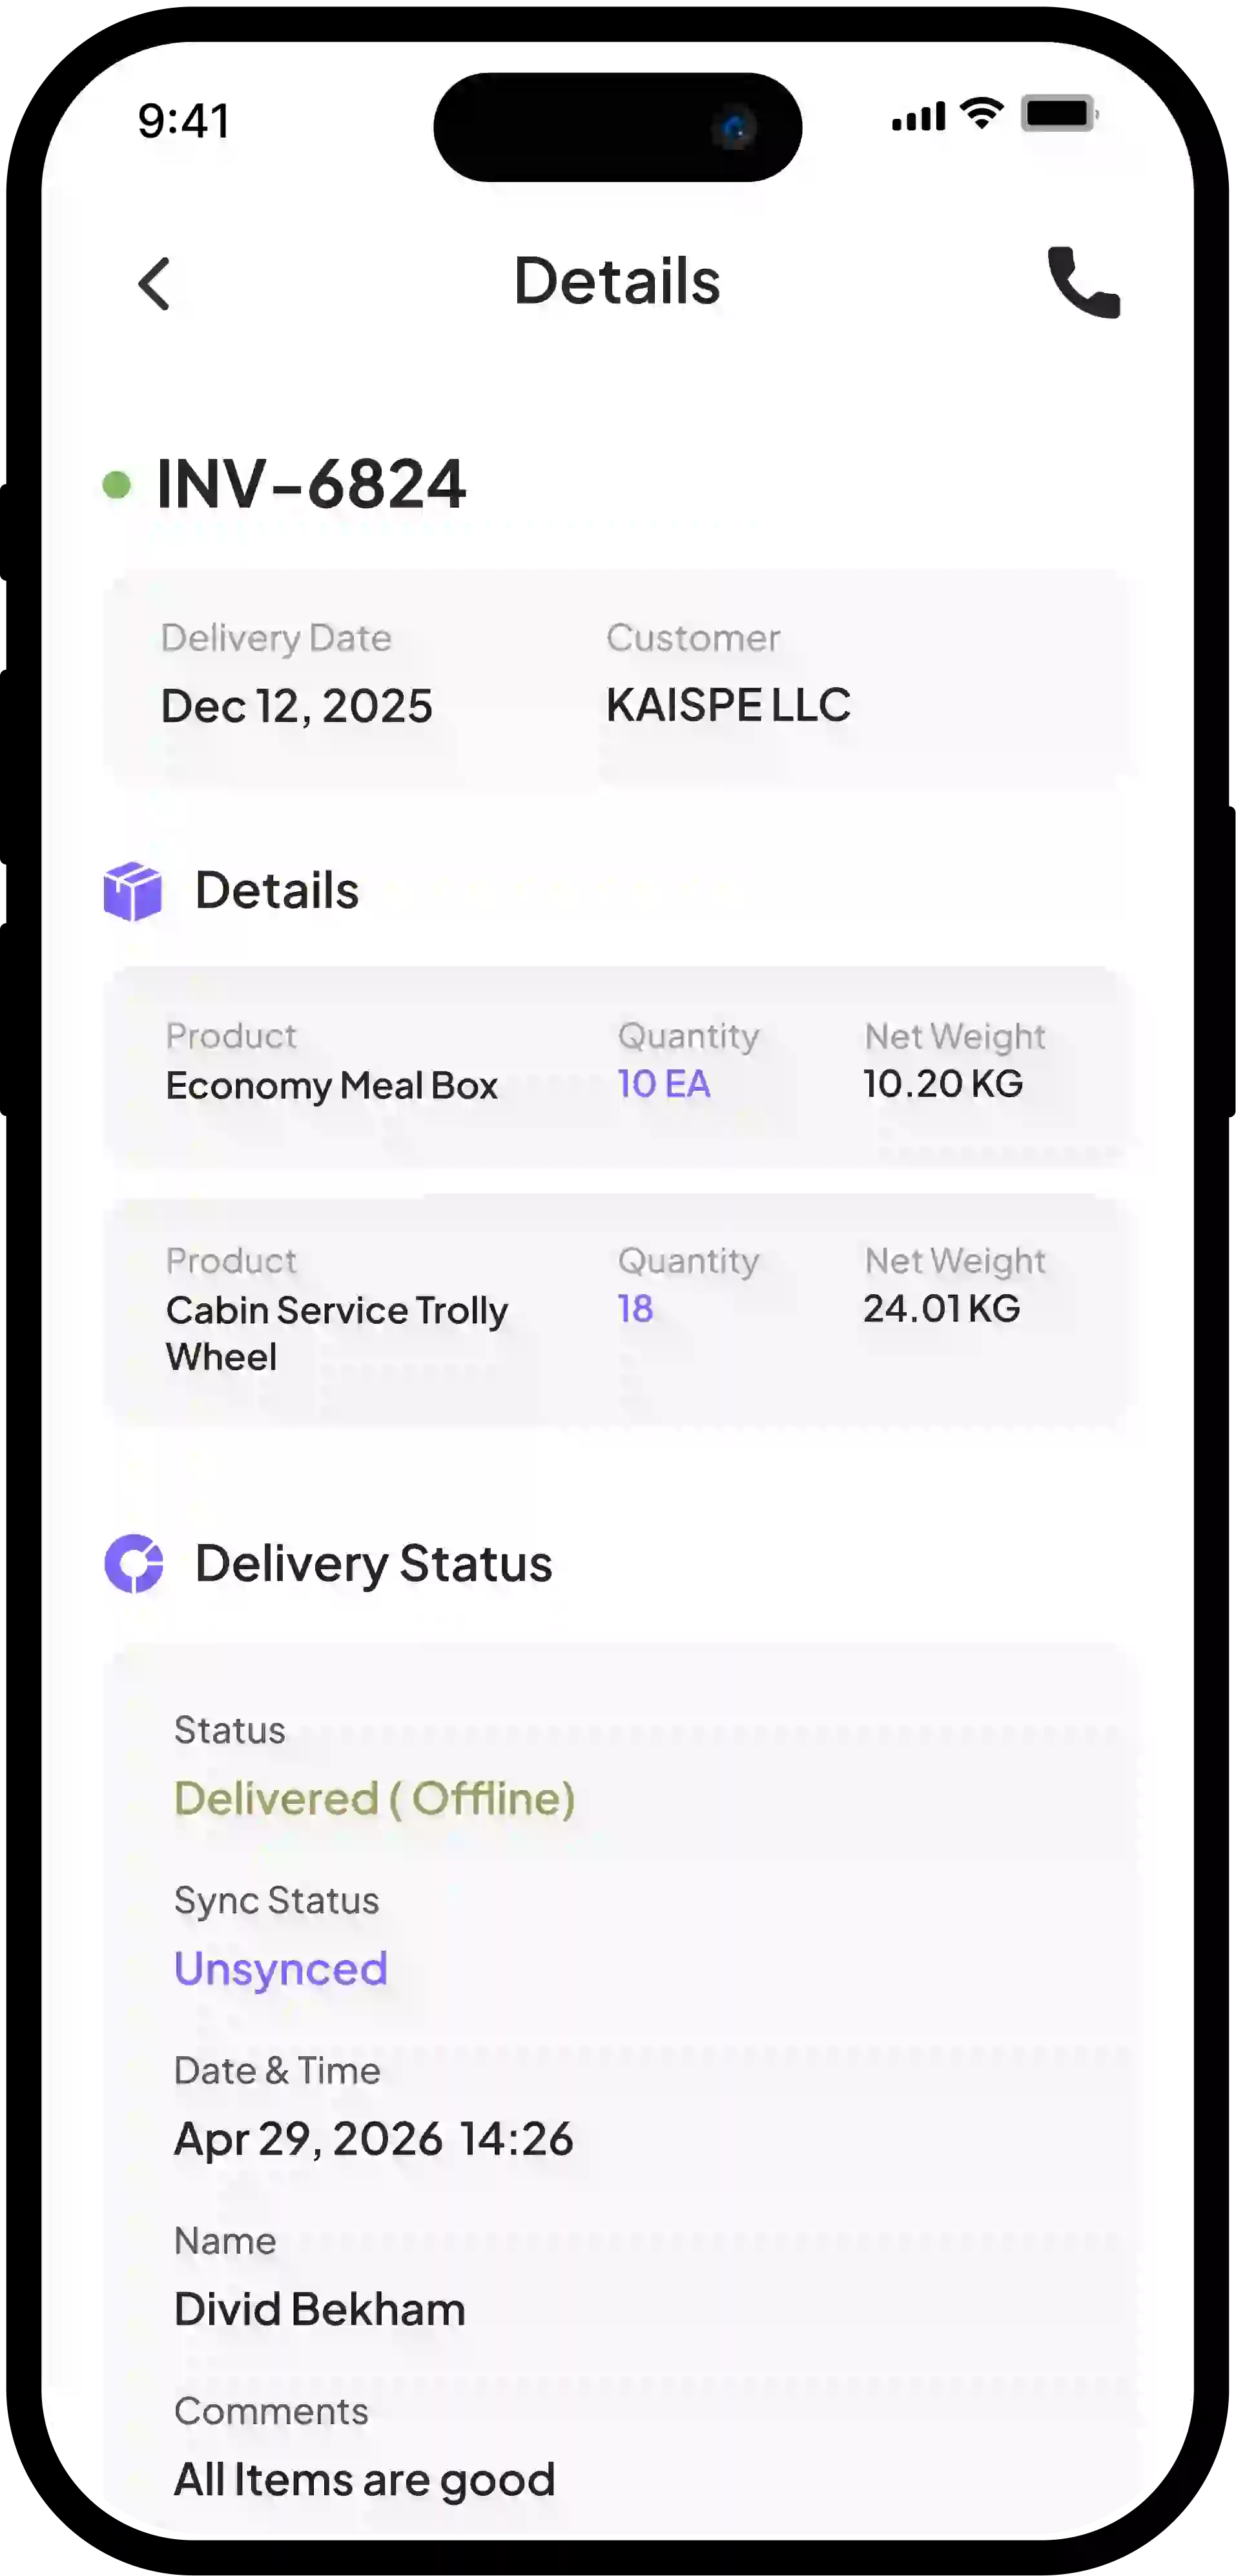
Step 4: Complete Order Confirmation
At the customer location, the delivery person opens the order confirmation screen and captures required details.
Depending on system configuration, the delivery person may need to capture:
- Receiver Name
- Alternate Email
- Comment
- Driver Note
- Proof Images
- Digital Signature
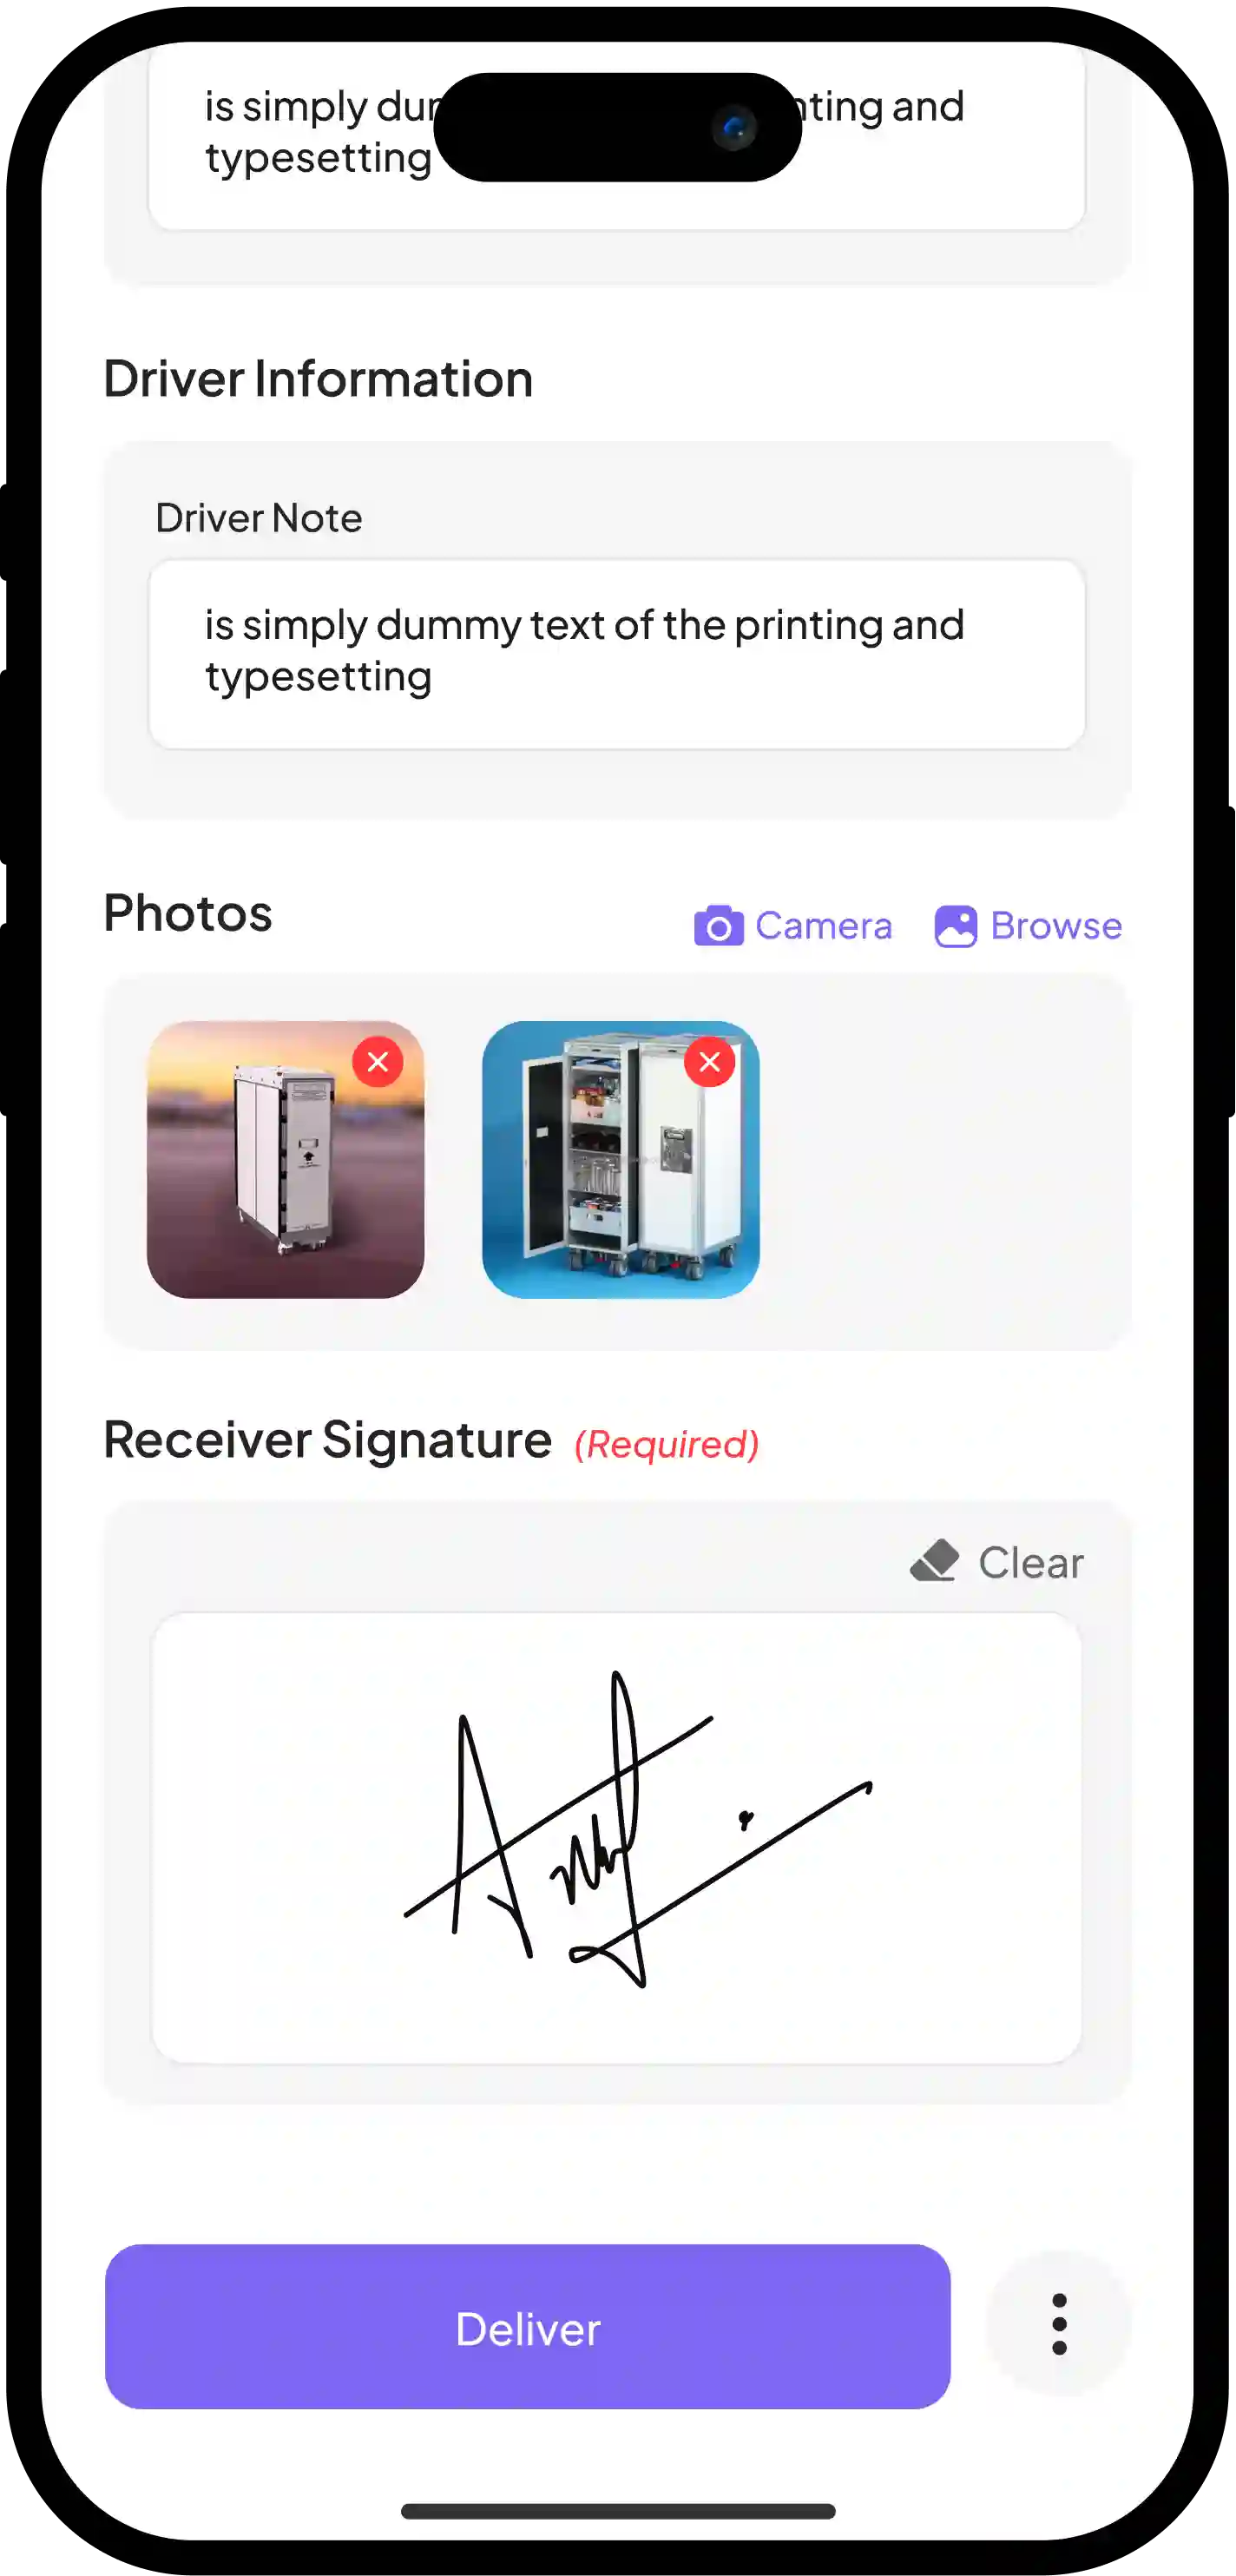
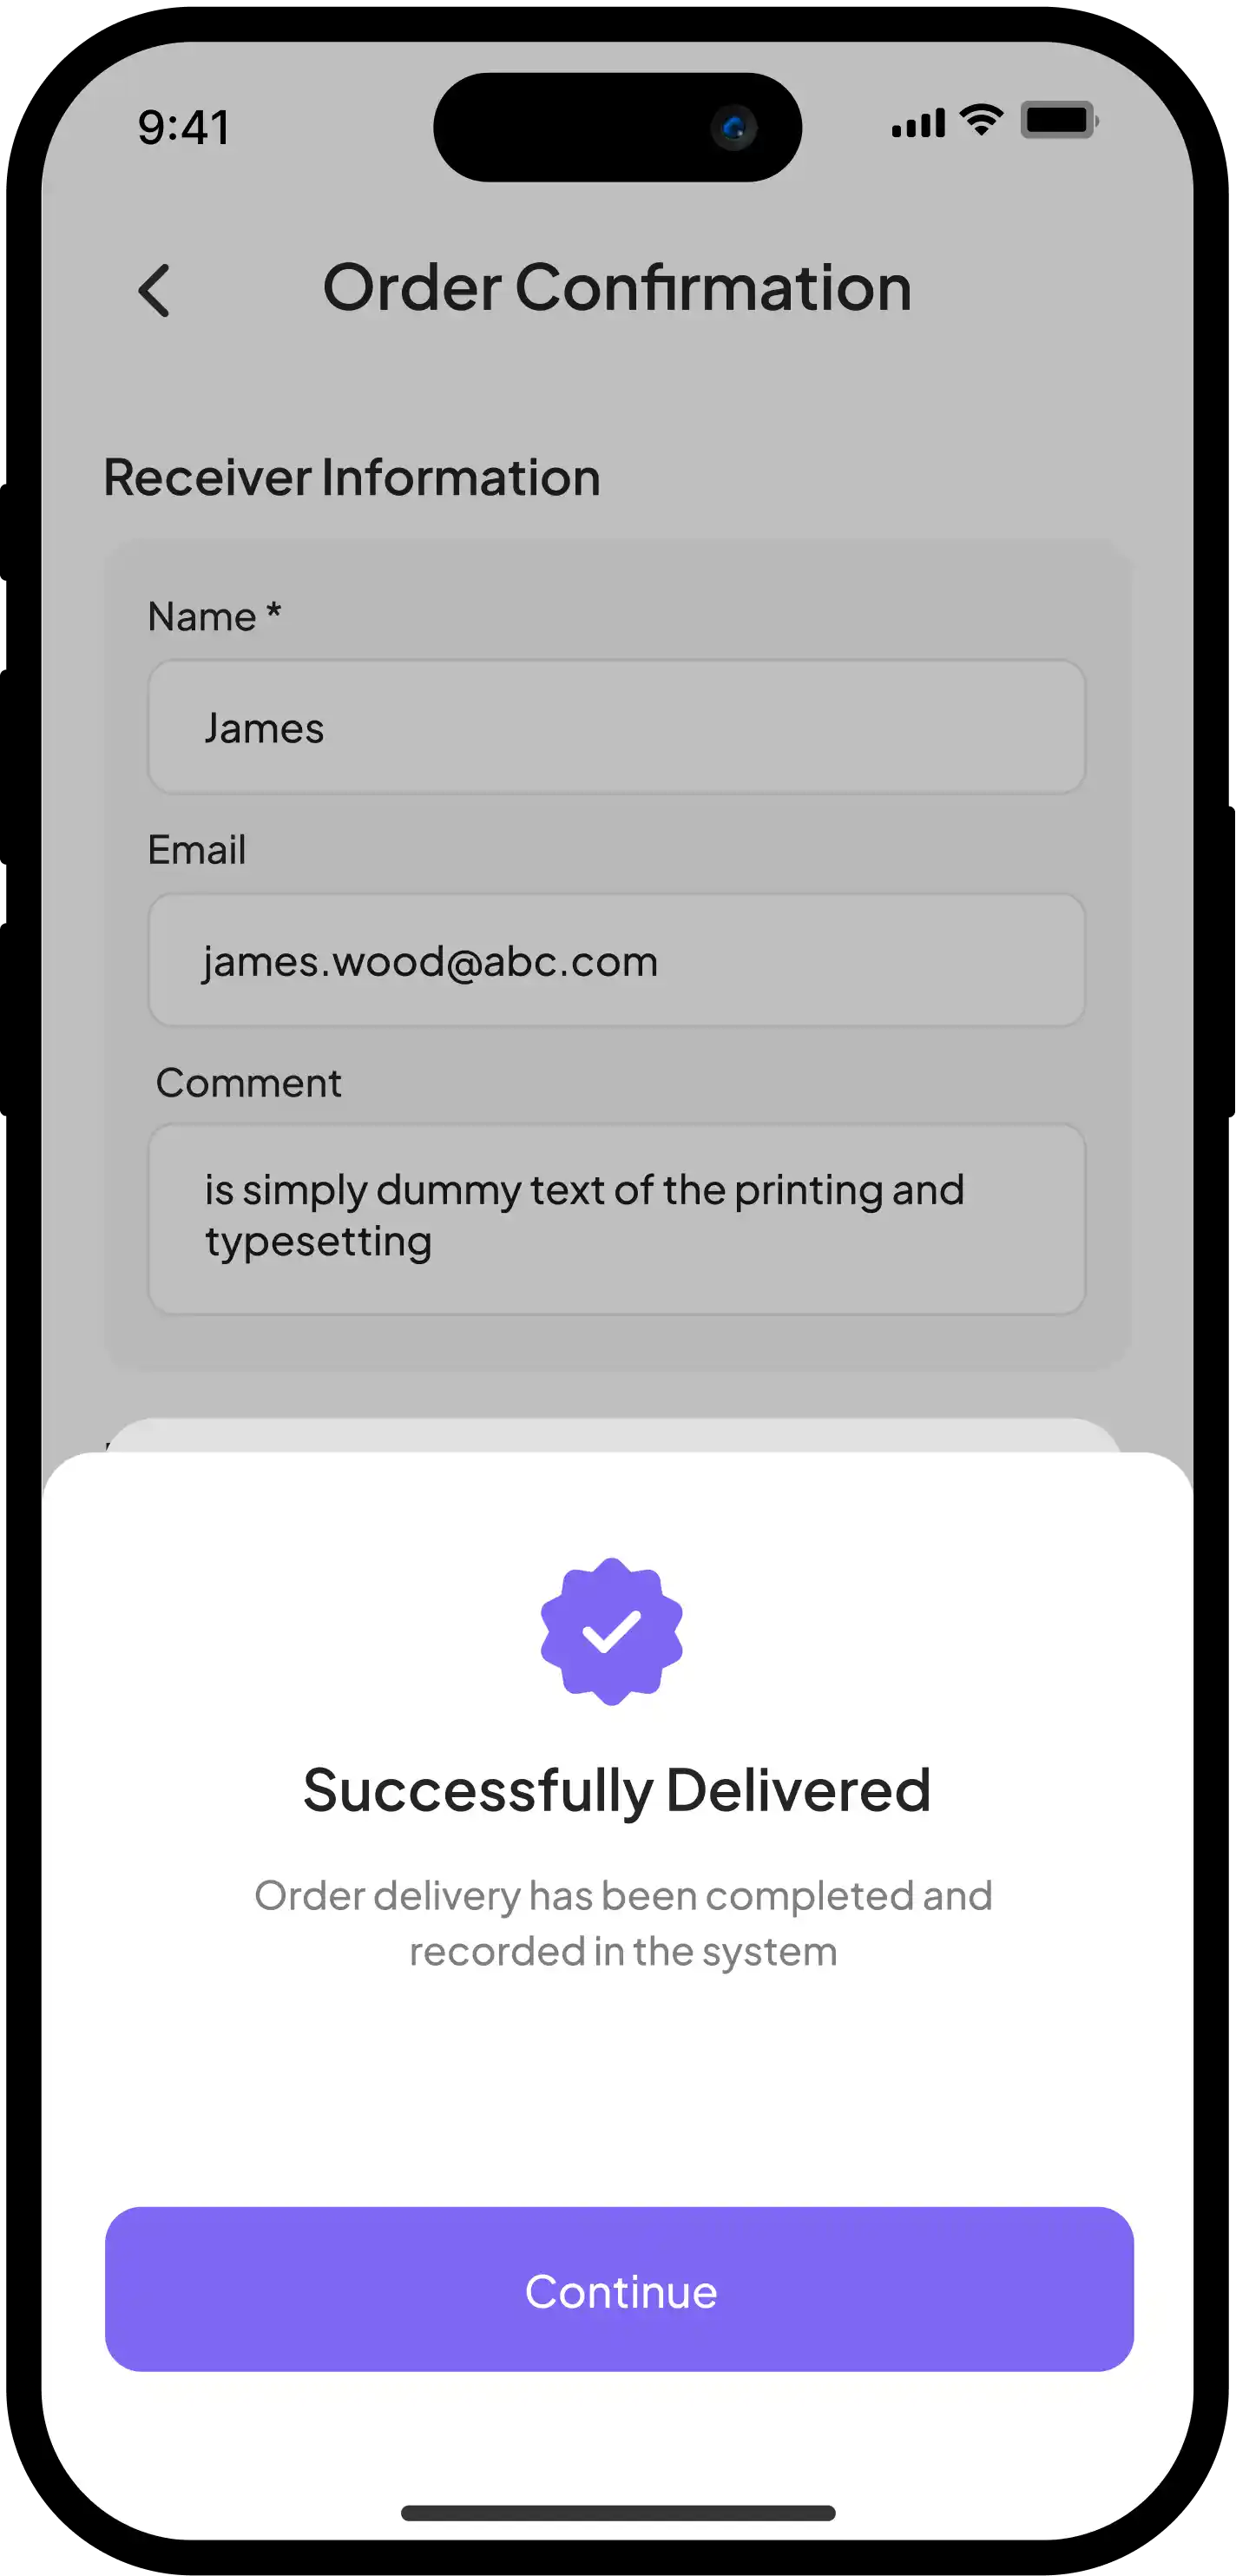
Step 5: Complete the Order
The delivery person can update the final status as:
| Status | Description |
|---|---|
| Delivered | Order was successfully delivered |
| Collected | Order was collected, returned, or picked up |
| On Hold | Delivery could not be completed due to an issue |
| Cancelled | Order was cancelled |
Offline Mode
KPoD supports offline operations for drivers. If internet connectivity is lost:
- Delivery person actions are saved locally.
- Sync status remains Pending.
- Records sync automatically when the connection is restored.
Try KAISPE KPoD for Free—No Commitment, Just Results
Get started with our Free Plan and experience the full potential of KAISPE’s KPoD and Order & Delivery Management features.